
In this blog, we’ll walk you through how to create a GTP with actions. Follow along with this step-by-step guide — and check out our Github repository here.
Create GPT
1. Go to https://chat.openai.com/gpts/discovery
2. Click on the “Create a GPT” button
.png?width=1120&disable=upscale&auto=webp)
3. Switch to the “Configure” tab

4. Fill out the “Configure” form
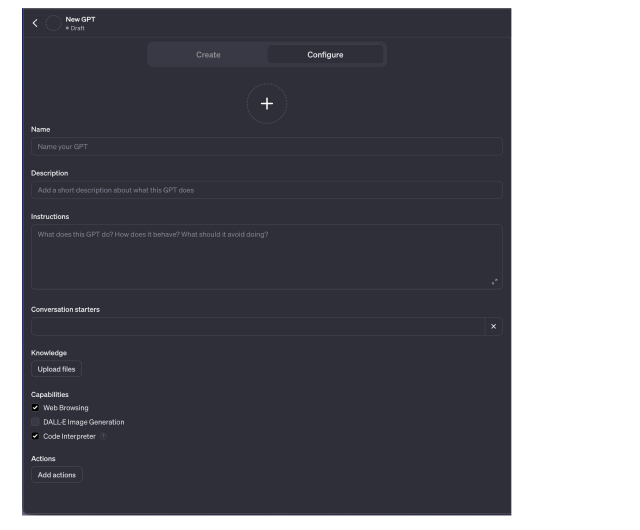
5. For example, I used these values:
- Name: Database Query
- Description: Query your database in English
- Conversation starters: Connect to a database
- Instructions: Prompt the user for database credentials (host, user, password and database) and use those credentials for the following user MySQL queries.
Important to note:iIn real GPT, the developer must provide a secure way to pass DB credentials. For example, to pass DB credentials in SingleStore GPT, the user receives a link to enter their data — which is encrypted and inserted into a separate database that is dedicated to GPT. - Capabilities: Web browsing and code interpreter.
6. Click the "Save" button before moving to the next step

Create GPT actions server
GPT actions are simple server API endpoints where GPT sends data depending on user prompts. It requires an OpenAPI schema which describes all server API endpoints and their parameters, requesting bodies and responses.
In our GPT when a user writes: “Get # of items from my db” the GPT will use the schema, find a relevant API endpoint which executes MySQL queries and send a request to the server with a generated MySQL query.
To prepare a server environment we need to do the following:
1. Navigate to a folder where you want to create a server
2. Create a Python environment by running python3 -m venv .venv
3. Activate the environment by running source .venv/bin/activate
4. Install dependencies by running pip install uvicorn fastapi mysql-connector-python
- uvicorn — runs the server
- fastpi — is a framework to build an API endpoints
- mysql-connector-python — MySQL connector
5. Create an app.py file, touch app.py. This is the server entrypoint where we will write code.
6. Run the app.py locally by running nodemon app.py
Now we are ready to code our server. Let’s follow these steps:
1. Open the app.py file
2. Import the MySQL connector and create the sql_connect function:
import mysql.connector

def sql_connect(host: str, user: str, password: str, database: str):
    connection = mysql.connector.connect(
        host=host,
        user=user,
        password=password,
        database=database
    )
    cursor = connection.cursor()
    return cursor, connection
3. Create a FastAPI instance
from fastapi import FastAPI

app = FastAPI()
4. Add a middleware to allow the server to accept requests from OpenAI.
from fastapi.middleware.cors import CORSMiddleware

app.add_middleware(
  CORSMiddleware,
  allow_origins=["https://chat.openai.com"],
  allow_methods=["*"],
  allow_headers=["*"],
  allow_credentials=True
)
5. Create a /api/query route that handles a MySQL query from the GPT request, execute it and return a result.
from fastapi import Request
@app.post('/api/query')
async def query(request: Request):
try:
# Parse request json to get request body
body = await request.json()
# Establish a database connection
cursor, connection = mysql_connect(
body.get('host'),
body.get('user'),
body.get('password'),
body.get('database')
)
# Extract a query from the request body
query = body.get('query')
# Execute query
cursor.execute(query)
� query_result = cursor.fetchall()
# Normalize and prepare the result
result = []
column_names = [column[0] for column in cursor.description]
for row in query_result:
row_dict = {}
for i in range(len(column_names)):
row_dict[column_names[i]] = row[i]
result.append(row_dict)
# Close connection
cursor.close()
connection.close()
return {'result': result}
except Exception as e:
return {'error': e.msg}6. Finally, use the unicorn to run the server
if __name__ == '__main__':
  import uvicorn
  uvicorn.run(app, host='0.0.0.0', port=4000)
After these steps you should see this output in your terminal. This indicates that your server has been started.
[nodemon] starting `python app.py`
INFO:     Started server process [20447]
INFO:     Waiting for application startup.
INFO:     Application startup complete.
INFO: Uvicorn running on http://0.0.0.0:4000 (Press CTRL+C to quit)Create OpenAPI schema
Alright, we are almost done. The last file and an API endpoint that we need to create are related to the OpenAPI schema. This schema describes our server API.
For that, let’s follow these steps:
1. Create an openapi.json file in the root of the project
2. Paste the following content. You can read about the OpenAPI file here.
{
"openapi": "3.1.0",
"info": {
"title": "Database Query",
"description": "Query your database in English.",
"version": "v0.0.1"
},
"servers": [{ "url": "" }],
"paths": {
"/api/query": {
"post": {
"description": "Executes a MySQL query to retrieve data.",
"operationId": "mysql_query",
"parameters": [],
"requestBody": {
"content": {
"application/json": {
"schema": {
"$ref": "#/components/schemas/mysql_queryRequestSchema"
}
}
},
"required": true
},
"deprecated": false,
"responses": {
"200": {
"description": "OK",
"content": {
"application/json": {
"schema": {
"type": "object",
"properties": {
"result": {
"description": "The query result"
}
}
}
}
}
}
}
}
}
},
"components": {
"schemas": {
"mysql_queryRequestSchema": {
"properties": {
"host": {
"type": "string",
"title": "host",
"description": "Database host"
},
"user": {
"type": "string",
"title": "user",
"description": "Database user"
},
"password": {
"type": "string",
"title": "password",
"description": "Database password"
},
"database": {
"type": "string",
"title": "database",
"description": "Database name"
},
"query": {
"type": "string",
� "title": "query",
"description": "A MySQL query that will be executed"
}
},
"type": "object",
"required": ["host", "user", "password", "database", "query"],
"title": "mysql_queryRequestSchema"
}
}
}
}3. Right after the @app.post(‘/api/query’) route, add the /openapi.json route to get the openapi.json file by an API endpoint.
import os
from fastapi.responses import FileResponse

@app.get('/openapi.json')
def get_openapi():
    file_path = os.path.join(os.getcwd(), 'openapi.json')
return FileResponse(file_path, media_type='application/json')Deployment
Now we can deploy the server as a regular Python application. But before that we need to update the app middleware and the openapi/servers/url values with our server address.
You can deploy the application using your method and get an address. For this example, , I will use ngrok to tunnel localhost: 4000.
To do this, you’ll follow these steps:
1. Leave the server running
2. Install ngrok
3. Open a new terminal tab in the root of the project and run ngrok http 4000
4. You can find the server address under the “Forwarding” section. You always get a random address on each ngrok execution. Run it once and copy the forwarding address; this time I have this address: https://f8ab506a9962.ngrok.app
5. Now copy your address and update the middleware in the app.py file and servers URL in the openapi.json
# ./app.py

app.add_middleware(
  CORSMiddleware,
  CORSMiddleware,  allow_origins=["https://chat.openai.com", "https://f8ab506a9962.ngrok.app"],
  allow_methods=["*"],
  allow_headers=["*"],
  allow_credentials=True
)
# ./openapi.json
...
"servers": [{ "url": "https://f8ab506a9962.ngrok.app" }],
...Add GPT actions
1. Go to the “Configure” tab
2. Click on the “Create new action” button
3. Copy the entire schema from the ./openapi.json and paste it into the “Schema” field
4. Add a privacy policy link. For this example, I’m using the SingleStore Privacy Policy
5. Click on the “Update” button to update the GPT
Result
That’s it! We are now free to play with our GPT — let’s start by connecting to a database.
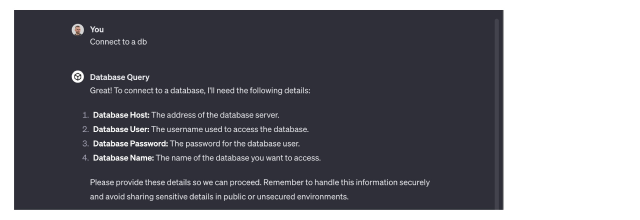
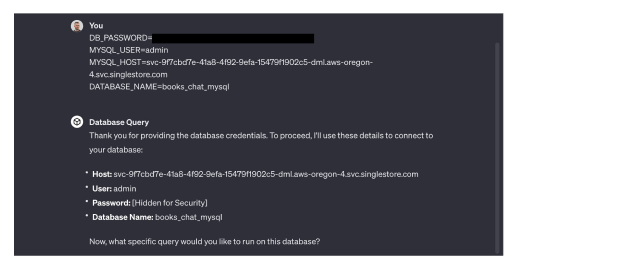
Provide database details. I simply copy and paste values from an .env., but you can enter it manually.
Ask the GPT to execute any query
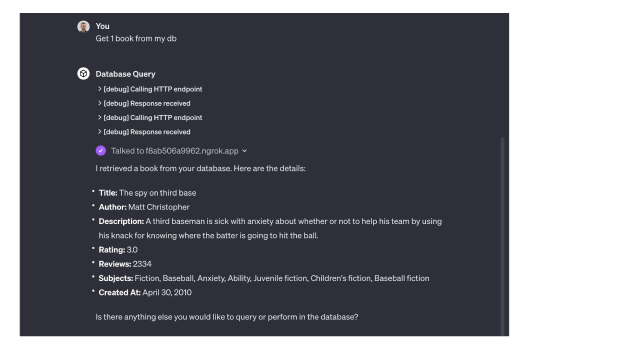
We can see that our GPT works. I am happy to share this guide with you — thank you!
To experiment more with GPTs and other generative AI functions, get started with your free Singlestore Helios trial.